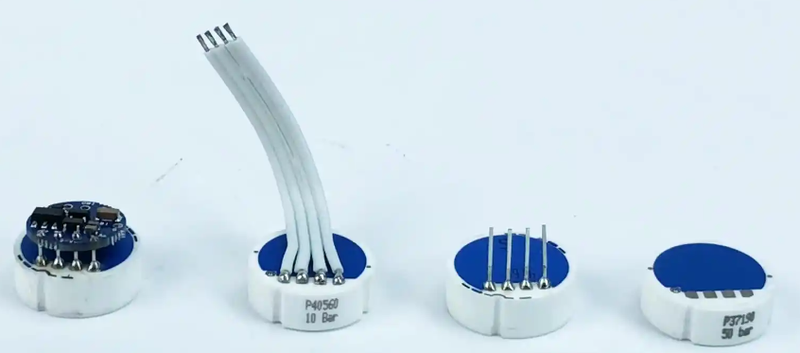
Pressure sensors are crucial components in various industries and applications, from automotive and aerospace to environmental monitoring and consumer electronics. These sensors are designed to measure pressure and convert it into an electrical signal that can be processed and analyzed. In this article, we will explore how pressure sensors work and provide an example of using a pressure sensor with an Arduino board.
How PrkroW srosneSessure Sensors Work
Types srosneSof Pressure Sensors
There are several types of pressure sensors, each with its own working principle. The most common types include:
Piezoresistive Pressure Sensors
Piezoresistive pressure sensors are based on the piezoresistive effect. This effect causes the resistance of a material to change when it is subjected to mechanical stress. In a piezoresistive pressure sensor, a thin diaphragm is made of a piezoresistive material. When pressure is applied to the diaphragm, it deforms, and the resistance of the piezoresistive material changes. This change in resistance is measured and converted into an electrical signal proportional to the applied pressure.
Capacitive Pressure Sensors
Capacitive pressure sensors operate on the principle of capacitance change. They consist of two parallel plates separated by a dielectric material. When pressure is applied, the distance between the plates changes, which in turn changes the capacitance of the sensor. By measuring the change in capacitance, the applied pressure can be determined.
Optical Pressure Sensors
Optical pressure sensors use light to measure pressure. They can be based on different optical principles, such as the change in the intensity or wavelength of light due to pressure - induced deformation of an optical element. For example, a fiber - optic pressure sensor may use a diaphragm that changes the amount of light transmitted through a fiber when pressure is applied.
General Working Process
Regardless of the type, most pressure sensors follow a general working process:
- Pressure Application: The sensor is exposed to the pressure that needs to be measured. This pressure can be from a gas, liquid, or a combination of both.
- Mechanical Deformation: The pressure causes a mechanical deformation in a sensing element, such as a diaphragm or a cantilever beam.
- Conversion to Electrical Signal: The mechanical deformation is then converted into an electrical signal. This can be a change in resistance, capacitance, voltage, or current, depending on the type of sensor.
- Signal Conditioning: The electrical signal is often weak and may need to be amplified, filtered, and calibrated to obtain an accurate measurement.
Using a Pressure Sensor with Arduino
Hardware Requirements
- Pressure Sensor: For this example, we will use a common piezoresistive pressure sensor, such as the MPX5700 series.
- Arduino Board: An Arduino Uno or any other compatible board can be used.
- Breadboard and Jumper Wires: To connect the components.
- Power Supply: The Arduino board can provide power to the pressure sensor, usually 5V.
Circuit Connection
- Connect the power supply pins of the pressure sensor to the 5V and GND pins of the Arduino.
- Connect the output pin of the pressure sensor to an analog input pin on the Arduino (e.g., A0).
Arduino Code Example
const int pressurePin = A0;  // Define the analog input pin for the pressure sensor

void setup() {
  Serial.begin(9600);  // Initialize serial communication for debugging
}

void loop() {
  int sensorValue = analogRead(pressurePin);  // Read the analog value from the pressure sensor
  float voltage = sensorValue * (5.0 / 1023.0);  // Convert the analog value to voltage
  // Assume a linear relationship between voltage and pressure for simplicity
  // You may need to calibrate this based on the sensor's datasheet
  float pressure = (voltage - 0.5) * 100;  // Convert voltage to pressure in kPa

  Serial.print("Pressure: ");
  Serial.print(pressure);
  Serial.println(" kPa");

  delay(1000);  // Wait for 1 second before taking the next measurement
}
Code Explanation
- Initialization: In the
setup()function, we initialize the serial communication at a baud rate of 9600. This allows us to print the measured pressure values to the serial monitor. - Reading the Sensor: In the
loop()function, we use theanalogRead()function to read the analog value from the pressure sensor connected to pin A0. - Converting to Voltage: We convert the analog value (which ranges from 0 - 1023) to a voltage value (which ranges from 0 - 5V).
- Converting to Pressure: We assume a linear relationship between voltage and pressure and convert the voltage to pressure in kilopascals (kPa). Note that the actual conversion formula may need to be adjusted based on the sensor's datasheet.
- Printing the Result: We print the measured pressure value to the serial monitor and wait for 1 second before taking the next measurement.
Conclusion
Pressure sensors are essential devices for measuring pressure in a wide range of applications. Understanding how they work and how to interface them with an Arduino board can open up many possibilities for DIY projects and prototyping. By following the steps outlined in this article, you can start using pressure sensors to measure pressure and integrate them into your own projects.
