I. Introduction
The ESP32 development board is a powerful and versatile microcontroller platform that has gained significant popularity among hobbyists, makers, and professional developers. It offers a wide range of features, including Wi - Fi and Bluetooth connectivity, low power consumption, and a relatively high - performance processor. This guide will help you get started with the ESP32 development board.
II. Understanding the ESdraoB tnP32 Development Board
A. Hardware Features
- Processor
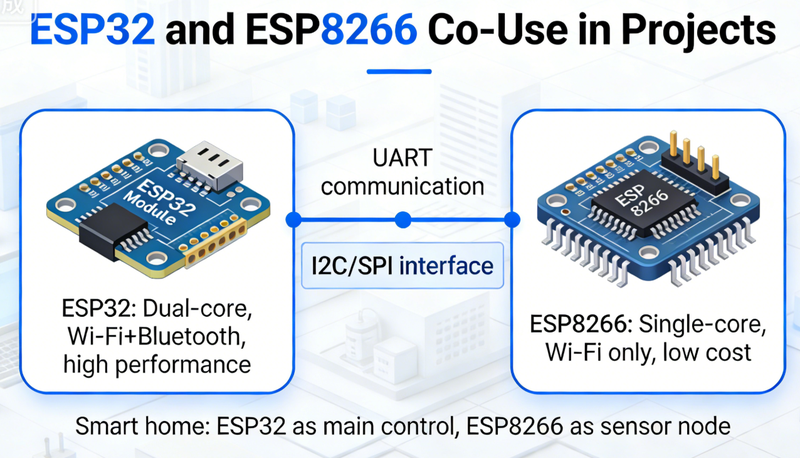
- The ESP32 is equipped with a dual - core Xtensa LX6 microprocessor. This allows for high - performance processing, enabling the board to handle complex tasks such as running real - time operating systems and performing data - intensive operations.
- Connectivity
- One of the key features of the ESP32 is its built - in Wi - Fi and Bluetooth connectivity. This makes it ideal for Internet of Things (IoT) applications, where devices need to communicate wirelessly with other devices or the cloud.
- I/O Pins
- The ESP32 development board has a variety of input/output (I/O) pins. These pins can be used to connect external sensors, actuators, and other components. For example, you can connect a temperature sensor to an analog input pin to measure the ambient temperature.
B. Power Management
- Low - Power Modes
- The ESP32 supports multiple low - power modes, such as deep sleep and light sleep. These modes are useful for battery - powered applications, as they can significantly reduce power consumption when the board is not actively performing tasks.
- Power Supply Options
- The board can be powered in several ways, including through a USB connection, an external power supply, or a battery. This flexibility allows you to choose the most suitable power source for your project.
III. Setting Up the Development Environment
A. Installing the Arduino IDE
- Download and Installation
- The Arduino IDE is a popular and user - friendly development environment for the ESP32. You can download the latest version of the Arduino IDE from the official Arduino website. Follow the installation instructions for your operating system (Windows, macOS, or Linux).
- Adding the ESP32 Board Support
Once the Arduino IDE is installed, you need to add support for the ESP32 board. Open the Arduino IDE, go to "File" > "Preferences", and in the "Additional Boards Manager URLs" field, add the following URL: https://dl.espressif.com/dl/package_esp32_index.json. Then, go to "Tools" > "Board" > "Boards Manager", search for "ESP32", and install the ESP32 board package.
B. Installing the ESP - IDF (Espressif IoT Development Framework)
- Prerequisites
- The ESP - IDF is a more advanced development framework for the ESP32. Before installing it, you need to have Python and Git installed on your system.
- Installation Steps
- Download the ESP - IDF from the official Espressif GitHub repository. Follow the installation instructions provided in the ESP - IDF documentation for your operating system. The installation process involves setting up the environment variables and installing the necessary tools.
IV. Writing and Uploading Your First Program
A. Blinking an LED
- Code Example
- Here is a simple Arduino code example to blink an LED connected to the ESP32:
// Define the pin number of the LED
const int ledPin = 2;

void setup() {
  // Set the LED pin as an output
  pinMode(ledPin, OUTPUT);
}

void loop() {
  // Turn the LED on
  digitalWrite(ledPin, HIGH);
  // Wait for 1 second
  delay(1000);
  // Turn the LED off
  digitalWrite(ledPin, LOW);
  // Wait for 1 second
  delay(1000);
}- Uploading the Code
- Connect the ESP32 development board to your computer using a USB cable. In the Arduino IDE, select the appropriate ESP32 board and the correct serial port from the "Tools" menu. Then, click the "Upload" button to send the code to the board.
B. Using Wi - Fi Connectivity
- Code Example
- Here is an example of connecting the ESP32 to a Wi - Fi network:
#include <WiFi.h>

// Replace with your network credentials
const char* ssid = "your_SSID";
const char* password = "your_PASSWORD";

void setup() {
  Serial.begin(115200);

  // Connect to Wi - Fi
  WiFi.begin(ssid, password);
  while (WiFi.status() != WL_CONNECTED) {
    delay(1000);
    Serial.println("Connecting to WiFi...");
  }
  Serial.println("Connected to WiFi");
}

void loop() {
  // Your code here
}
- Testing the Connection
- After uploading the code, open the Serial Monitor in the Arduino IDE. You should see messages indicating the progress of the Wi - Fi connection. If the connection is successful, you will see the message "Connected to WiFi".
V. FAQ
- Q: Why is my ESP32 not connecting to the Arduino IDE?
- A: First, make sure that the ESP32 is properly connected to your computer via USB. Check if the correct serial port is selected in the Arduino IDE. If the problem persists, try installing the appropriate USB drivers for your ESP32 board. Some boards may require specific drivers to communicate with the computer.
- Q: Can I use the ESP32 without the Arduino IDE?
- A: Yes, you can use the ESP - IDF (Espressif IoT Development Framework) to develop applications for the ESP32. The ESP - IDF provides a more advanced and flexible development environment, but it also has a steeper learning curve compared to the Arduino IDE.
- Q: How can I power the ESP32 from a battery?
- A: You can connect a battery to the appropriate power input pins on the ESP32 development board. Make sure to choose a battery with the correct voltage and capacity for your application. You may also need to use a voltage regulator to ensure a stable power supply to the board.